Making Perfect Kaiser rolls at Home
Kaiser rolls are a popular type of bread known for their distinct shape and delightful taste. These artisan rolls often feature a beautifully crisp crust and a soft, airy interior. Many enjoy Kaiser rolls served alongside a meal or as a base for sandwiches. The appeal lies not only in their flavor but also in their texture, which balances crispiness with pillowy softness.
Baking at home brings numerous benefits. It allows for creativity in the kitchen while offering a satisfying experience. homemade bread is fresher and often healthier than store-bought options. The aroma of fresh yeast bread filling your home is hard to rival. Involving oneself in the process of baking can also be therapeutic, bringing joy as each step unfolds.
What sets these rolls apart is their impressive appearance and taste. The crusty exterior provides a satisfying crunch, while the soft rolls inside melt in your mouth. Mastering the art of roll shaping is key to unlocking their full potential. With the right baking tips and techniques, anyone can achieve the perfect texture and finish. Experiment with various bread recipes to create a delightful addition to any dinner table. Enjoy the journey of making Kaiser rolls that will impress family and friends alike.
Understanding Kaiser Rolls

History and Origin of Kaiser Rolls
Kaiser rolls have a rich history. They originated in Austria, dating back over a century. The name “Kaiser” comes from the word for “emperor” in German. Legend has it that the shape of these rolls symbolizes the crown worn by emperors. Many bakers in Vienna took pride in crafting these rolls. They became popular across Europe, making their way to America with immigrants. Today, they are loved for their perfect balance of crust and softness.
Characteristics of Perfect Kaiser Rolls
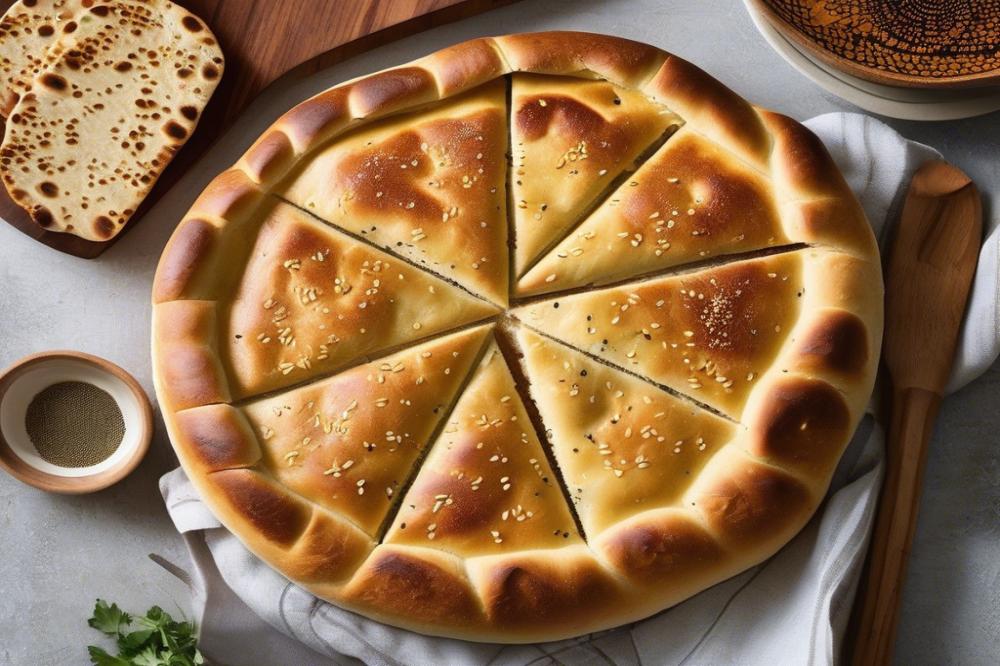
A successful kaiser roll has distinct features. The crust should be golden-brown and slightly crisp. This gives a satisfying crunch when you take a bite. Inside, the bread must be soft and airy. This creates a delightful contrast with the crust. Flavor also plays a crucial role. A hint of sweetness, combined with a Yeasty aroma, sets this roll apart. The perfect texture is essential, making it great for sandwiches or enjoying with butter. While baking at home, paying attention to these details is key for achieving the best results.
Comparison with Other artisan rolls and Dinner Rolls
In the world of bread, kaiser rolls share space with various artisan rolls. Unlike generic dinner rolls, these have a more defined shape and texture. Soft rolls may lack the crusty exterior that characterizes a perfectly baked roll. Similar to other artisan rolls, kaiser rolls often showcase the baker’s skills. Roll shaping is important in creating their signature appearance. Bread recipes that include these rolls give them a unique identity. The balance of flavors in such rolls is exceptional. Their structure is firm, yet tender inside, unlike typical soft dinner rolls.
Ingredients and Quantities

Making delicious Kaiser rolls at home involves gathering several essential ingredients. First, choose high-quality bread flour, as it provides the necessary structure and gluten for those crusty artisan rolls we all love. Proper flour can make a significant difference in the final product.
Next is yeast; this ingredient is crucial for the dough’s rise. Active dry yeast or instant yeast works well. A reliable source will enhance the flavor of your yeast bread. You’ll also need water, preferably warm, to activate the yeast. This simple ingredient hydrates the flour and binds the mixture together.
Salt is important for flavor and controls yeast activity, while sugar feeds the yeast, helping it to work efficiently. Both ingredients play a vital role in achieving the right balance of taste and texture.
Butter adds richness to the dough, resulting in soft rolls with flavor depth. It enhances the overall mouthfeel and keeps the rolls from being too dry.
For a standard batch, consider using these suggested quantities for about 12 rolls:
- 4 cups of bread flour
- 2 teaspoons of active dry yeast
- 1 and 1/2 cups of warm water
- 1 and 1/2 teaspoons of salt
- 1 tablespoon of sugar
- 2 tablespoons of soft butter
Choosing the right ingredients is essential for perfect texture in your dinner rolls. Fresh yeast leads to effective rising and better flavor in your baking. Always opt for the best ingredients available to elevate all of your bread recipes.
Before starting to knead, it’s helpful to check the flour’s protein content. A higher percentage helps create a better gluten structure, critical for shaping those rolls. When you focus on quality, every bite of your Kaiser rolls will reflect the care you’ve taken.
Step-by-Step Method

Mixing ingredients: tips for combining for the best dough
Start with high-quality ingredients. Use fresh yeast, warm water, and good flour. Combine flour and salt in a large bowl first. Create a well in the center and add yeast mixed with water. Gently stir until everything comes together. If the mixture sticks to your hands, that’s okay. It indicates moisture, which is key for soft rolls. Gradually incorporate more flour if needed, but be careful not to overdo it. A slight stickiness at this point helps achieve a perfect texture later.
Kneading the dough: achieving the right consistency
Move the dough to a clean surface. Begin kneading by pushing it away with the heels of your hands. Fold it over, then repeat this motion. Do this for about 8 to 10 minutes. The dough should become smooth and elastic. Test it by pressing your finger in; it should spring back. If it seems too stiff, you may need to add a little water. Look for a balance where it’s soft but holds its shape well.
First rise: fermentation importance for flavor and texture
Place the dough in a greased bowl and cover it with a damp cloth. Keep it in a warm area for about one hour, or until it doubles in size. Fermentation plays a crucial role in flavor. The yeast eats sugar, producing bubbles and acids that enrich the bread’s taste. More time allows for richer flavors, so don’t rush this step. Patience here results in better artisan rolls later.
Shaping the rolls: detailed techniques for roll shaping
After the first rise, gently deflate the dough. Divide it into equal pieces, around three to four ounces each. Roll each piece into a tight ball. To create the traditional kaiser shape, flatten each ball slightly. Then, using a sharp blade, score the top with a cross pattern. This helps steam escape during baking, giving you that lovely crusty bread texture. Proper roll shaping makes a visible difference in the final appearance and flavor.
Second rise: tips for achieving lightness and airiness
Transfer the shaped rolls onto a baking tray lined with parchment paper. Cover them loosely with a clean towel and let them rise for another 30 minutes. This second rise allows the dough to relax further, creating a lighter roll. Avoid drafts during this time, as they can hinder rising. If the rolls look puffy, they are ready for baking. Baking at home can be rewarding when you see the dough transform into golden, airy rolls.
Baking the Perfect Kaiser Rolls

Preparing the Oven and Baking Environment
Preheat the oven to 450°F (232°C). A hot oven is essential for a crisp crust. Place a baking stone or baking sheet inside to heat up. Steam can help create that needed crust. Once the oven is hot, add a pan of water, letting it simmer as you bake. This small addition will create a humid environment. Controls like these make a difference when baking at home.
Scoring the Rolls for Traditional Kaiser Shape
Shaping the dough is crucial. After forming small balls, use a sharp blade to score each one. The classic pattern consists of four cuts, forming a star shape. This scoring not only provides a distinctive look but also allows the bread to expand. Keep the cuts shallow to achieve a defined shape. Adding this technique into your bread recipes will enhance the appearance of your artisan rolls.
Baking Temperature and Time for Crusty Bread
Place the rolls in the oven on the preheated stone or sheet. They should bake for about 20 to 25 minutes. Checking for golden brown color signals that they are nearly ready. Adjusting the baking time may be necessary based on your specific oven. Every oven has tiny differences in heating, so stay alert. Proper heat levels make all the difference when crafting lauded dinner rolls.
Tips for Achieving the Perfect Balance Between Crust and Softness
A delicate balance exists between a crunchy outside and a soft inside. Consider lifting the rolls slightly off the baking tray to promote even heat circulation. You can also experiment with different flour types. Using bread flour increases gluten strength, promoting a chewier texture. Another useful baking tip is to let them cool on a wire rack after removing from the oven. This prevents sogginess on the bottom. Enjoying fresh, warm rolls with the right texture is a reward for your efforts.
Baking Tips and Troubleshooting
When making artisan rolls, issues can arise that leave you feeling frustrated. One common problem is dense texture. If your rolls turn out too heavy, it’s often due to insufficient kneading. You want to develop the gluten for a nice structure. Another issue can be rolls that spread too much while baking. This could happen if the dough is too wet. Adjusting flour slightly can help. For rolls that don’t brown on top, ensure your oven is at the correct temperature. Sometimes an oven thermometer can be a lifesaver.
Enhancing Flavor and Texture
Flavor is key when it comes to creating delicious rolls. Adding a bit of malt powder can give them a slightly sweet taste and a lovely color. Consider using brown sugar instead of white for a deeper flavor profile. Experiment with adding herbs or garlic to the dough for a unique twist. Additionally, proofing the dough longer can lead to a lighter, airier texture. Using bread flour instead of all-purpose flour can also create a chewier bite, which is especially delightful in yeast bread.
Storing and Reheating Leftover Rolls
Storing rolls properly is essential for maintaining freshness. Place them in a paper bag or wrap them in a clean kitchen towel. This keeps them crusty and prevents them from becoming too soft. If you want to keep them longer, freezing is a great option. Wrap each roll tightly in plastic wrap and store them in an airtight container. When you need to reheat, wrap them in foil and pop them in a preheated oven for about 10 minutes. This method helps restore the perfect texture, making them taste freshly baked again.
Final Thoughts on Baking Artisan Rolls at Home
Making delicious rolls at home brings joy and satisfaction. Few things compare to the smell of freshly baked bread wafting through your kitchen. Each knead and fold can be a comforting ritual. With a little practice, anyone can master this craft. Enjoying warm rolls right out of the oven is truly rewarding.
Don’t hesitate to get creative! Different flavors can elevate your rolls to new heights. Try adding herbs, spices, or even cheeses. Each addition can bring a unique twist. Experimentation is part of the fun and can lead to delightful surprises in flavor. Share these creations with friends and family, and enjoy their reactions.
Baking serves as more than a skill. It provides a creative outlet and a sense of accomplishment. The act of creating something from scratch is both fulfilling and calming. So, gather your ingredients, put on your apron, and dive into this culinary adventure. With these baking tips in hand, you are ready to embark on your own baking journey!